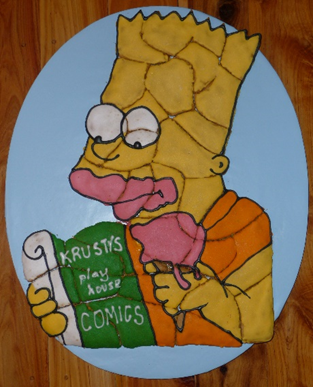
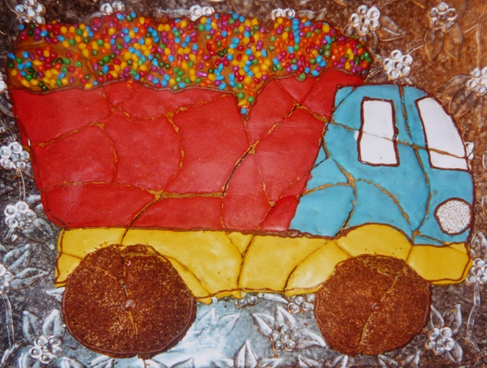
My children always loved these Gingerbread Jigsaw biscuits. We usually had them as a part of their birthday party. They would choose the theme and I would make a cake and a gingerbread jigsaw to suit the party theme. Check out the Gluten Free jigsaw gingerbread recipe below!

Take a look at some of the Gingerbread Jigsaw at the end of the post for other celebration ideas.
Where To Start Your Christmas Gingerbread Jigsaw
Start by choosing your picture. I find that searching for a cartoon based picture gives you something with clean minimal lines and a few colours to get the picture across.
Take a look below at Aragog, the spider from the Harry Potter series. Those spindly legs do make it more likely that the gingerbread could break, so try to choose pictures that are more compact, especially if you are just starting out.

Your picture must fit on one cookie baking sheet. It must also fit on the serving board, tray or platter. This gingerbread biscuit does spread when it’s cooked, so don’t draw your picture so it JUST fits the board you are serving it on, leave room for it to expand.
You can see here in my Grinch example that there is plenty of room around the edges for this biscuit to expand and still fit on the baking sheet and the serving board.
I have covered my serving board in paper suitable to the final presentation of the biscuit.
Recipe & Method For Gingerbread Jigsaw
- Prep time: 50 minutes (plus finding and drawing your picture)
- Cook time: < 15 minutes
- Yield: 1 jigsaw cookie approx. the size of a cookie baking sheet
- Icing time: 1-2 hours, depending on skill, picture and number of colours
- Need baking paper, royal icing, food colouring and piping bag & nozzle
Gluten Free Gingerbread Jigsaw Biscuit
This gingerbread recipe makes a generous volume of dough because the size of your pictures can vary. This Grinch gingerbread used about half of the dough. I cook up the excess dough as individual cookies. The leftover Royal icing is used to cover these too. The family can eat these leftovers while the final cookie waits for the party.
The eggs and butter should be at room temperature.
I tend to use just ground ginger in this recipe, but some like to also add about 1 teaspoon of cinnamon.
Ingredients: Gingerbread Jigsaw
- 250g butter
- 180g (1 ½ cups) dark brown sugar
- 2 eggs
- 600g (4 cups) GF self-raising flour
- 2 tsp xanthan gum
- 1 tsp bicarbonate of soda
- 1 ½ Tbsp ground ginger
- ¼ tsp salt
- 4 tablespoons Golden Syrup
- Extra GF self-raising flour for kneading
Method: Gingerbread Jigsaw
- Pre heat oven to 1800C (3500F)
- Cream the butter and the sugar until light in colour and fluffy.
- Add the eggs and beat well.
- Combine and sift the dry ingredients, then fold them into the mixture by hand or use a very slow speed on your electric mixer
- Add the golden syrup and mix well
- Sprinkle extra GF flour onto a flat surface and knead the mixture until soft but not sticky.
- Cover with plastic wrap and chill for 30 minutes.

Cutting The Gingerbread Jigsaw
Prepare the baking tray by greasing it and covering it with baking paper. You may need to cut baking paper up to ensure the whole tray is covered.
The dough will be rolled out and cut out on the baking paper covered cookie sheet.
Place your baking paper covered tray on your bench.
Flour it and roll out the dough to 3-4mm (1/8in) in thickness. Be gentle so the paper does not crease underneath the dough. If it does, gently lift the dough and ease the paper flat again under it.

It needs to be large enough for your pattern to fit on it as one picture. Try to have the dough the same height in the middle as it is on the edges.
With a knife, carefully cut around the shape outline of the pattern. Remove all the excess dough from the edges.
(You can use this excess dough later to cook regular biscuits).

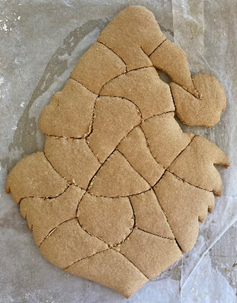
Take your knife and cut squiggly lines through the dough, intersecting them to make odd shaped jigsaw pieces.
If you know you are having 20 kids to the party, ensure you have at least 20 jigsaw shapes in your picture.
Where To Bake The Gingerbread Jigsaw
Position the tray, middle to top of the oven, and cook for 10-15 minutes. If toward the bottom of the oven, the biscuit will burn at the base.

It should be a little golden in colour when you remove it from the oven.
Straight away, take your knife and cut through all of the jigsaw lines again to break the connection, as they would have cooked together in the oven.
It will harden on cooling, so don’t overcook it to make it hard.
Leave on the tray to cool
While it cools you can prepare the royal icing. Pre-sift the icing sugar to ensure the lumps are broken down. If you have quite a big biscuit you may need more icing than this recipe. If you intend to cook up the leftover dough and cover it with royal icing too, then you will need to double this recipe.
Royal Icing Recipe & Method
- 1 egg white
- 250g (8oz) pure icing sugar
- Beat the egg white in a small bowl until bubbles start to form
- Add the icing sugar 1 tablespoon at a time, beating well after each addition.
- You are looking for a spreadable consistency, but not too runny, especially if using 2 or more colours in your end picture.
- Colour your icing as your picture requires
To mark the gingerbread with your design
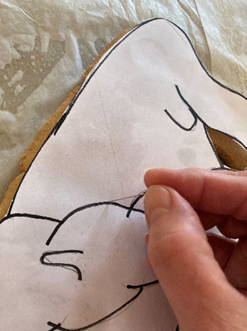
- Place your paper template back on top of your cooked biscuit. It will be a bit smaller now that the biscuit is cooked.
- Take a pin and prick through the lines you have drawn on the paper which make up the details of the picture that you need to colour with the icing.

- You can then take a skewer or the pin and gently scratch a line onto your biscuit to join the dots.
- These lines will cross jigsaw pieces, and allow you to know what colour goes on what side of the line. Then when it’s placed together again all the colours will be in the right place to see the picture.
Start Covering Your Gingerbread Jigsaw With Icing

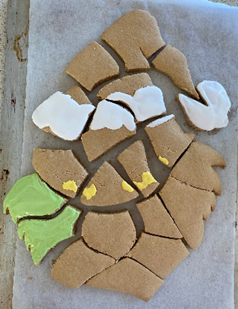
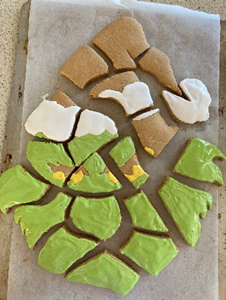
- I start with the light coloured icings because the icing needs time to set before adding a darker colour (especially reds and blacks). If the dark colours are added before it sets it is more likely to bleed into the lighter shade.
- I have spread these on with a knife, but if you are quite practiced you can pipe an edge and flood in the colour
- Transfer the jigsaw pieces to the serving board or platter.
- To keep the jigsaw in place on the serving board you may need to place a tiny bit of icing under the outer edge pieces to stop them moving.
- Usually, I only do this if I need to transport the biscuit somewhere.
- The last thing to do when the icing is set, is to add the black features

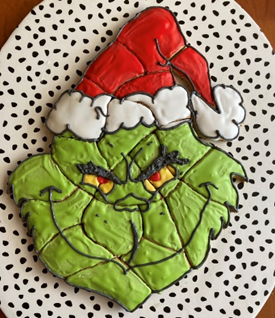
- Then pipe around the edges of the design to complete the picture. This also helps to hold the jigsaw together.
- Do not put this in the fridge or the colours in the icing will become moist and bleed when you take it out.
- When the icing is set, you can cover the biscuit in plastic wrap.
Those little hands can’t wait to take a jigsaw bit when it is served.